How to Run ScanDisk in Windows 8/7/8.1/Vista/XP
This article explains how to run ScanDisk in Windows 8/7/8.1/XP/Vista, what is Scandisk and how does it help maintaining your computer in good shape.
When you notice that your computer system starts to runs slow, programs stop responding halfway, or other slow down problems such as the CPU usage for the system process constantly approaches 100 percent, that will be the time for you to perform maintenance clean ups such as ScanDisk for your computer.

What is Scandisk in Windows?
ScanDisk is a utility built-into Microsoft Windows which checks your drive to make sure there aren’t any problems with it. ScanDisk scans your hard disk for errors and manage to repair the errors found.
The errors usually caused by improper system shut down, improper installations of certain programs, files, viruses, worms or Trojan horses. Using ScanDisk Utility to scan and correct errors can fix damage caused to Windows systems and improve system performance.
Just like you give your car a gradual maintenance check periodically to make sure your car is safe to drive, you should as well scan your hard disk periodically to keep your system running smooth.
How to Run ScanDisk in Windows 8/7/8.1/Vista/XP
Run Scandisk in Windows 8/7/8.1
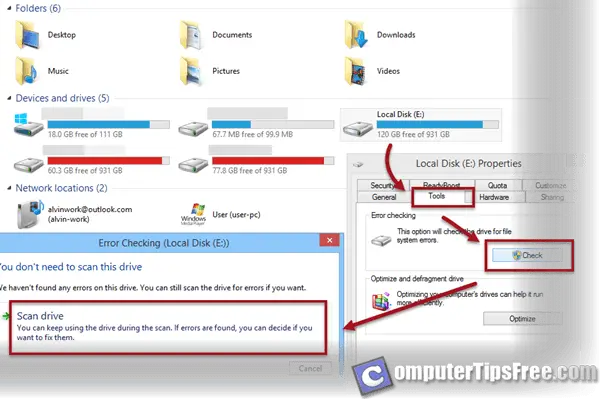
Go to your “This PC” or often known as “My Computer” in the older version of Windows OS. Right click the hard disk partition that you would like to run ScanDisk on and select Properties. Go to the Tools tab. Under Error Checking, click on the Check button to open Scandisk. This action requires administration rights. When prompted for administrative permission, select OK or Yes. Click on Scan Drive to start running Scandisk.
If the Windows OS is installed on that particular disk partition, it will need to be restarted before the Scandisk can be run.
For Windows 95/98/ME Users:
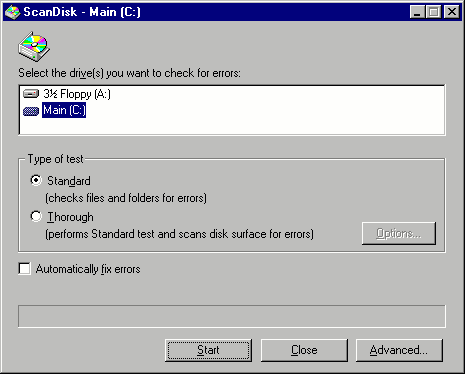
(Start –> Programs –> Accessories –> System Tools –> ScanDisk)
Select the drive you would like to check, then select the type of test you would like ScanDisk to run. A standard test checks the FAT tables and directories entries only, it takes shorter time to complete the process. A thorough test checks on each single sector of the drive and it takes longer time to complete the process. Finally, click “Start”.
For Windows XP/Vista Users:
Double-click “My Computer”, and then right-click the “hard disk” that you want to check.
Click “Properties”, and then click “Tools”.
Under “Error-checking”, click “Check Now”.
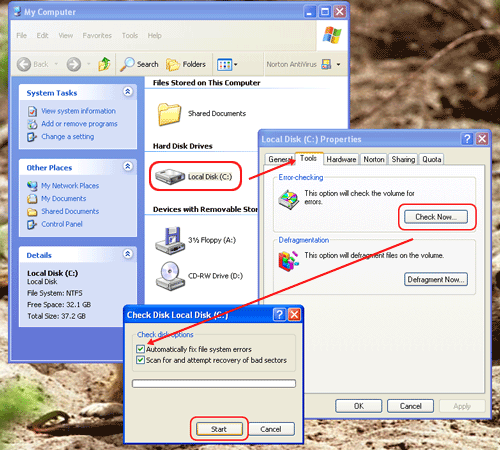
To repair errors without scanning the volume for bad sectors, select the “Automatically fix file system errors” check box. To repair errors, locate bad sectors, and recover readable information, select the “Scan for and attempt recovery of bad sectors” check box. Finally, click “Start”.
For Windows XP Users, if you receive the following message:
“The disk check could not be performed because the disk check utility needs exclusive access to some Windows files on the disk. These files can be accessed by restarting Windows. Do you want to schedule the disk check to occur the next time you restart the computer?
Click “Yes” to schedule the disk check, and then restart your computer to start the disk check.
When running Scandisk in Windows 8/7/8.1/Vista Users, if you receive the following message:
“Windows can’t check the disk while it’s in use – Do you want to check for hard disk errors the next time you start your computer?
Click “Schedule Disk Check”, and then restart your computer to start the disk check.