How to create Free Email Account with Your Own Domain Name
This tutorial will guide you through detailed steps on how to create free email account with your own domain name. First, we will see if you already have a domain name or an already established website. If you don’t, you will have to purchase a domain from any of the hosting companies.
We will not be touching much about choosing and purchasing a domain name or hosting as it differs from companies to companies. There are thousands of hosting companies around the world. You will just have to pinpoint one that best suit your needs and is popular enough to be reliable. After you have obtained your new domain name, continue with the steps below.
There are a few conditions that have to be met before you can make an email account on your own domain name. Firstly, you need to make sure that your domain name is working and pointing to your web hosting server. To do so, type your domain name in any web browser. If you see a placeholder homepage(your webpage) or directory listing but not “Website Not Found”, your domain name is working fine.

How to create an Email Account with Your Own Domain Name – Requirement
Next, you have to make sure that you are allowed by your hosting company to create email account based on your own domain name. Usually they will allow you to set up new email account if you pay for the hosting plan, but there is a limit to the number of email accounts you can create. (Free hosting plans usually don’t offer email services.)
Lastly, you have to make sure you can access your hosting control panel provided by your web hosting company. If you are the owner of your domain name, your hosting company should have already gave you the account ID and Password. If the domain name is owned by your company or your team, you should request for authority to access the control panel so that you can set up new email account for yourself.
Please take note that different hosting companies offer different control panels. Cpanel is among the most popular ones. We will show you example through Cpanel. Don’t worry, the steps are usually the same, the only difference you will ever notice will be the interface of which you will have to navigate.
Beginning to create an Email Account with Your Own Domain Name
Alright, here we go. First of all, you have to login to your hosting control panel. The company would provide you with the direct URL of the control panel like www.yourdomainname.com/cpanel, www.yourdomainname.com/admin, www.yourdomainname.com/vdeck or whatever. As I’ve said before, different hosting companies offer different options. So you should contact your hosting company if you do not know the URL of the control panel.
 Next, look for a link or an icon to the email management utility. For example, my hosting control panel(Exabytes) has a Email Accounts icon as shown on the left. With this Utility, you can add, edit or delete email accounts.
The first thing you will possibly see after clicking the mail icon is a form like the one shown below.
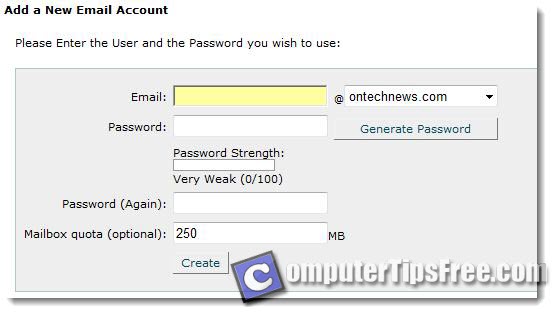
Enter a username, a password and the amount of space(mail box quota) you want to allocate to this email account. Note that the space used by the email accounts comes from the total web space allocated to you in your web hosting package. If you still do not know what is this about, just left it as default or put it 250mb if your hosting plan offer web space of more than 1gb. In other words, you cannot set up an email account with 200MB space if you have only 100MB storage with your web hosting plan. Finally, click the “create” or “ok” button.
Congratulation, you have just created an email account with your own domain name! But how are you going to access your email account?
How to check emails from your newly created email account on your own domain
1. Use the Web Mail services offered by your hosting company. Web Mail or Webmail allows you to check your email from a web browser as opposed to a desktop mail application such as Outlook Express or Thunderbird. This means that you can check your email from any web browser. To do so, click the webmail icon and you will see few webmail services. The most common webmail services are Horde and SquirrelMail. Simply choose one that you like the most. A login form will be displayed on the page after clicking one of those webmail services. Just fill in the form with your username and password that you’ve created and start checking or sending email!
2. Use Outlook Express or Windows Mail to check your email. To learn how to set up the email accounts you have just created in any of these email clients, you can refer the sample steps in Gmail Outlook settings for SMTP, POP3, IMAP Server which includes the similar instructions to setup any email account in email clients of your choice universally.
Please make sure to log out after checking your email on public computers to prevent other people from reading your email.